
Author: administrator

  • PHP strlen() vs mb_strlen(): Understanding String Length with Unicode (Code Example)

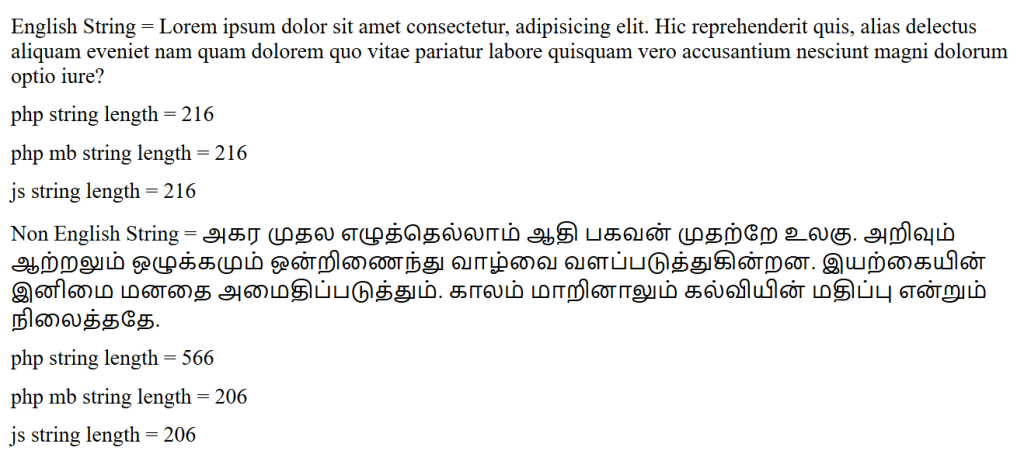
    When working with strings in PHP, it’s common to use strlen() to determine the length of a string. However, if your application supports languages like Tamil, Hindi, Japanese, Chinese, or emojis, strlen() may not return the result you expect.

    In this article, we’ll compare strlen(), mb_strlen(), and JavaScript’s length property using both English and Tamil text.

    Test Data

    We will use the following strings:

    English String

    $str1 = "Lorem ipsum dolor sit amet consectetur, adipisicing elit...";
    

    Tamil String

    $str2 = "அகர முதல எழுத்தெல்லாம் ஆதி பகவன் முதற்றே உலகு...";
    

    Measuring String Length

    Our PHP code displays the length using three different methods:

    strlen($str);
    mb_strlen($str);
    

    The browser also calculates the length using JavaScript:

    str.length
    

    Results

    English Text

    FunctionResult
    strlen()Same as character count
    mb_strlen()Same as character count
    JavaScript lengthSame as character count

    For English text, all three methods usually return the same value because English characters occupy a single byte in UTF-8.

    Tamil Text

    The situation changes completely with Unicode languages.

    FunctionWhat it Counts
    strlen()Number of bytes
    mb_strlen()Number of Unicode characters
    JavaScript lengthNumber of UTF-16 code units

    Since Tamil characters require multiple bytes in UTF-8, strlen() returns a much larger number than the actual number of readable characters.

    For example:

    தமிழ்
    

    Depending on the encoding:

    echo strlen("தமிழ்");      // Larger value (bytes)
    echo mb_strlen("தமிழ்");   // 5 characters
    

    The exact byte count depends on the UTF-8 encoding of each character, while mb_strlen() correctly reports the number of characters.

    Why Does This Happen?

    strlen()

    strlen() simply counts bytes stored in memory.

    For example:

    A = 1 byte
    B = 1 byte
    C = 1 byte
    

    So:

    strlen("ABC") // 3
    

    But Tamil letters occupy multiple bytes:

    அ = 3 bytes
    க = 3 bytes
    ர = 3 bytes
    

    Therefore:

    strlen("அகர")
    

    returns the total number of bytes rather than the number of visible characters.

    mb_strlen()

    The mb stands for MultiByte.

    mb_strlen() understands UTF-8 encoding and counts actual Unicode characters instead of bytes.

    echo mb_strlen($str, "UTF-8");
    

    or simply

    echo mb_strlen($str);
    

    provided your internal encoding is UTF-8.

    Whenever your application supports international languages, this is the recommended function.

    JavaScript length

    JavaScript behaves differently.

    const str = "தமிழ்";
    console.log(str.length);
    

    JavaScript stores strings as UTF-16. The length property returns the number of UTF-16 code units.

    For most Tamil letters, this often appears close to the visible character count, but it’s not a true Unicode character count.

    Characters outside the Basic Multilingual Plane (such as many emojis) occupy two UTF-16 code units.

    Example:

    "😀".length
    

    returns:

    2
    

    even though only one emoji is displayed.

    Which Function Should You Use?

    ScenarioRecommended Function
    ASCII / English onlystrlen()
    UTF-8 multilingual websitesmb_strlen()
    Word limitsmb_strlen()
    Form validationmb_strlen()
    Database field validationmb_strlen()
    JavaScript UI displaylength (with Unicode caveats)

    Best Practice

    If your application may contain:

    • Tamil
    • Hindi
    • Japanese
    • Chinese
    • Korean
    • Arabic
    • Emojis

    always prefer:

    mb_strlen($string)
    

    instead of:

    strlen($string)
    

    Also ensure the Multibyte String extension (mbstring) is enabled in your PHP installation.

    Complete Example

    $str1 = "Lorem ipsum dolor sit amet...";
    $str2 = "அகர முதல எழுத்தெல்லாம் ஆதி பகவன் முதற்றே உலகு.";
    
    echo strlen($str1);
    echo mb_strlen($str1);
    
    echo strlen($str2);
    echo mb_strlen($str2);
    

    Conclusion

    The difference between strlen() and mb_strlen() is simple but important:

    • strlen() counts bytes.
    • mb_strlen() counts characters.
    • JavaScript’s length counts UTF-16 code units, which usually—but not always—match the number of visible characters.

    If your PHP application supports multiple languages, using mb_strlen() will help you avoid incorrect character counts, validation errors, and unexpected behavior with Unicode text.

    <?php
    
    $str1 = "Lorem ipsum dolor sit amet consectetur, adipisicing elit. Hic reprehenderit quis, alias delectus aliquam eveniet nam quam dolorem quo vitae pariatur labore quisquam vero accusantium nesciunt magni dolorum optio iure?";
    $str2 = "அகர முதல எழுத்தெல்லாம் ஆதி பகவன் முதற்றே உலகு. அறிவும் ஆற்றலும் ஒழுக்கமும் ஒன்றிணைந்து வாழ்வை வளப்படுத்துகின்றன. இயற்கையின் இனிமை மனதை அமைதிப்படுத்தும். காலம் மாறினாலும் கல்வியின் மதிப்பு என்றும் நிலைத்ததே.";
    ?>
    
    <!DOCTYPE html>
    <html lang="en">
    <head>
      <meta charset="UTF-8">
      <meta name="viewport" content="width=device-width, initial-scale=1.0">
      <title>Document</title>
      <style>
        div{
          margin: 10px 0;
        }
      </style>
    </head>
    <body>
      <div>English String = <?php echo $str1; ?></div>
      <div>php string length = <?php echo strlen($str1); ?></div>
      <div>php mb string length = <?php echo mb_strlen($str1); ?></div>
      <div>js string length = <span id="jsstr1len"></span></div>
    
        <div>Non English String = <?php echo $str2; ?></div>
      <div>php string length = <?php echo strlen($str2); ?></div>
      <div>php mb string length = <?php echo mb_strlen($str2); ?></div>
      <div>js string length = <span id="jsstr2len"></span></div>
    
    
    <script>
      const str1 = "<?php echo $str1; ?>";
      document.getElementById("jsstr1len").innerText = str1.length;
    
       const str2 = "<?php echo $str2; ?>";
      document.getElementById("jsstr2len").innerText = str2.length;
    </script>
    </body>
    </html>
  • DevOps Workshop at PSNA College of Engineering and Technology

    The Department of Computer Science and Engineering (Artificial Intelligence & Machine Learning) at PSNA College of Engineering and Technology successfully organized an insightful workshop on “DevOps for Full-Stack Application Development”. The session was designed to introduce students to modern software development practices and the importance of integrating development and operations for faster, reliable, and scalable application delivery.

    The workshop provided participants with a practical understanding of how DevOps methodologies transform traditional software development processes by promoting collaboration, automation, continuous integration, continuous deployment (CI/CD), and infrastructure management.


    Workshop Overview

    Modern software development demands rapid delivery cycles, continuous improvements, and reliable deployments. DevOps has emerged as a critical practice that bridges the gap between development and operations teams, enabling organizations to deliver software faster and more efficiently.

    This workshop focused on the role of DevOps in full-stack application development, covering the complete lifecycle of building, testing, deploying, and maintaining modern web applications.

    Students gained valuable insights into industry-standard tools, deployment strategies, automation techniques, and best practices followed by leading software organizations worldwide.


    Key Topics Covered

    Introduction to DevOps

    Understanding the evolution of DevOps, its principles, benefits, and role in modern software development.

    Full-Stack Application Architecture

    Overview of frontend, backend, databases, APIs, and deployment environments.

    Version Control with Git

    Managing source code effectively using Git and collaborative development workflows.

    Continuous Integration (CI)

    Automating code integration, testing, and validation processes.

    Continuous Deployment (CD)

    Deploying applications efficiently through automated deployment pipelines.

    Containerization with Docker

    Understanding container technology and its role in application portability and scalability.

    Cloud Deployment Strategies

    Exploring cloud platforms and deployment approaches for modern applications.

    Monitoring & Maintenance

    Ensuring application reliability through monitoring, logging, and performance optimization.


    Learning Outcomes

    Participants gained knowledge on:

    • DevOps fundamentals and industry practices
    • Full-stack development lifecycle management
    • CI/CD pipeline concepts
    • Source code management and collaboration
    • Containerization and deployment automation
    • Cloud-based application hosting
    • Software delivery best practices
    • Career opportunities in DevOps and Cloud Engineering

    Benefits to Students

    The workshop enabled students to understand how modern organizations develop and deploy applications at scale. It also provided exposure to technologies and methodologies that are widely adopted across the software industry.

    By participating in the session, students enhanced their technical knowledge and gained practical insights into industry workflows that can support their academic projects, internships, and future careers.


    Conclusion

    The DevOps for Full-Stack Application Development workshop served as an excellent platform for students to explore the intersection of software development and IT operations. Through expert guidance and practical discussions, participants learned how DevOps enables faster delivery, improved software quality, and scalable application management.

    The session reinforced the importance of continuous learning and industry-oriented skill development, preparing students for the evolving demands of the software engineering landscape.

    Event Details

    Workshop: DevOps for Full-Stack Application Development
    Organized By: Department of Computer Science and Engineering (AI & ML)
    Institution: PSNA College of Engineering and Technology
    Date: 26 June 2024
    Category: Technical Workshop / DevOps / Full-Stack Development

  • Workshop on Recent Trends in Web Development at St. Peter’s College of Engineering and Technology

    Skriptx successfully conducted an insightful workshop on “Recent Trends in Web Development” at St. Peter’s College of Engineering and Technology on March 20, 2024. The workshop was organized to help students understand the rapidly evolving landscape of web technologies and equip them with industry-relevant development skills.

    The session focused on modern web development practices, emerging frameworks, current industry trends, and career opportunities in the software development ecosystem. Students actively participated in the workshop and gained valuable exposure to real-world web application development methodologies.

    About the Workshop

    Web development has undergone significant transformation over the past decade. With the rise of modern JavaScript frameworks, cloud technologies, responsive design principles, and AI-powered applications, developers are required to continuously adapt to new technologies and development practices.

    The workshop aimed to bridge the gap between academic learning and industry expectations by introducing students to the latest advancements in frontend and backend development technologies.

    Workshop Objectives

    The primary objectives of the workshop were:

    • To introduce students to modern web development technologies.
    • To provide insights into current industry practices.
    • To familiarize participants with frontend and backend development workflows.
    • To discuss career opportunities in web and software development.
    • To encourage students to build real-world projects using modern technologies.

    Key Topics Covered

    During the workshop, participants explored a wide range of web development concepts, including:

    Modern Frontend Development

    • HTML5 and CSS3 Best Practices
    • Responsive Web Design
    • JavaScript Fundamentals
    • Modern UI/UX Principles
    • Component-Based Development

    Frontend Frameworks and Libraries

    • React.js Overview
    • Angular Ecosystem
    • Vue.js Introduction
    • Single Page Applications (SPA)

    Backend Development

    • Server-Side Development Concepts
    • REST API Development
    • Database Integration
    • Authentication and Authorization

    Emerging Industry Trends

    • Progressive Web Applications (PWA)
    • Cloud-Based Web Applications
    • AI Integration in Web Applications
    • Low-Code and No-Code Platforms
    • API-Driven Development
    • Web Performance Optimization

    Industry Insights and Career Guidance

    One of the highlights of the workshop was the discussion on current industry demands and career opportunities in software development.

    Students received guidance on:

    • Career paths in Web Development
    • Full Stack Development Opportunities
    • Essential Skills for Software Engineers
    • Building Professional Portfolios
    • Internship and Placement Preparation
    • Open Source Contributions

    Interactive Learning Experience

    The workshop encouraged active student participation through discussions, demonstrations, and practical examples. Real-world case studies helped participants understand how modern web applications are designed, developed, deployed, and maintained in production environments.

    Students had the opportunity to clarify technical concepts, explore development workflows, and gain exposure to industry-standard practices.

    Learning Outcomes

    By the end of the workshop, participants were able to:

    • Understand the latest trends in web development.
    • Recognize the importance of responsive and user-centric design.
    • Gain awareness of modern frontend and backend technologies.
    • Explore emerging tools and frameworks used in the industry.
    • Identify career opportunities in software and web development.
    • Develop a roadmap for continuous learning and skill enhancement.

    Acknowledgement

    Skriptx extends its sincere gratitude to the management, faculty members, coordinators, and students of St. Peter’s College of Engineering and Technology for their support and enthusiastic participation.

    The success of the workshop reflects a shared commitment toward empowering students with practical technical knowledge and preparing them for the evolving technology landscape.

    About Skriptx

    Skriptx is a technology company specializing in Software Development, SaaS Solutions, Web Technologies, Artificial Intelligence, Machine Learning, and Professional Training Programs. Through industry-focused workshops and technical initiatives, Skriptx empowers students and professionals with the practical skills required to succeed in today’s digital world.

  • AI & ML Workshop at Excel Engineering College

    Skriptx successfully organized a two-day workshop on “Building Intelligence Applications with Artificial Intelligence and Machine Learning” for students of the Department of Information Technology at Excel Engineering College (Autonomous) on March 27 and 28, 2025.

    The workshop was conducted at the Data Science Lab and was designed to provide students with practical knowledge and industry-oriented insights into Artificial Intelligence (AI) and Machine Learning (ML). The event aimed to help participants understand how intelligent systems are developed and how AI technologies are transforming various industries worldwide.

    About the Workshop

    Artificial Intelligence and Machine Learning have become essential technologies driving innovation across healthcare, finance, manufacturing, education, e-commerce, and numerous other sectors. Recognizing the growing demand for AI professionals, Skriptx designed this workshop to bridge the gap between academic learning and industry expectations.

    The workshop focused on introducing students to the core concepts of AI and ML while demonstrating how intelligent applications are built using modern tools, frameworks, and methodologies.

    Workshop Highlights

    • Introduction to Artificial Intelligence and Machine Learning
    • Understanding Intelligent Applications and Their Architecture
    • Real-World Applications of AI Across Industries
    • Data Collection, Processing, and Analysis
    • Machine Learning Fundamentals and Model Development
    • AI-Powered Automation and Decision Making
    • Industry Trends and Emerging Technologies
    • Career Opportunities in AI, ML, and Data Science
    • Interactive Question and Answer Sessions
    • Hands-On Learning and Practical Demonstrations

    Day 1 – Foundations of Artificial Intelligence and Machine Learning

    The first day focused on establishing a strong understanding of Artificial Intelligence and Machine Learning concepts.

    Students explored:

    • What is Artificial Intelligence?
    • Evolution of AI Technologies
    • Difference Between AI, Machine Learning, and Deep Learning
    • Importance of Data in AI Systems
    • Machine Learning Workflow
    • Real-World Case Studies and Success Stories

    Participants gained valuable insights into how organizations leverage AI to solve complex problems, improve efficiency, and drive innovation.

    Day 2 – Building Intelligent Applications

    The second day concentrated on practical implementation and industry applications.

    Topics covered included:

    • Designing Intelligent Applications
    • AI-Based Problem Solving Techniques
    • Data Processing and Model Training Concepts
    • Deployment Considerations for AI Solutions
    • Future Trends in Artificial Intelligence
    • Generative AI and Emerging Technologies
    • Career Guidance and Industry Readiness

    Students actively participated in discussions and practical sessions, enabling them to connect theoretical concepts with real-world applications.

    Learning Outcomes

    By the end of the workshop, participants were able to:

    • Understand the fundamentals of Artificial Intelligence and Machine Learning.
    • Recognize the role of data in building intelligent systems.
    • Identify real-world use cases of AI technologies.
    • Gain awareness of industry tools and development workflows.
    • Explore career opportunities in AI, Machine Learning, Data Science, and related domains.
    • Develop a roadmap for further learning in advanced AI technologies.

    Student Participation and Engagement

    The workshop witnessed enthusiastic participation from students of the Department of Information Technology. Throughout the two-day program, students actively engaged in technical discussions, explored emerging AI technologies, and clarified their doubts through interactive sessions.

    Their curiosity, energy, and willingness to learn contributed significantly to the success of the event.

    Acknowledgement

    Skriptx extends its sincere gratitude to the management, faculty members, workshop coordinators, and students of Excel Engineering College (Autonomous) for their support, cooperation, and active participation.

    The collaboration reflects a shared commitment to equipping students with industry-relevant skills and preparing them for the future of technology.

    About Skriptx

    Skriptx is a technology-driven company specializing in Software Development, SaaS Solutions, Artificial Intelligence, Machine Learning, Software Training, and Emerging Technologies. Through industry-focused workshops, training programs, and technical initiatives, Skriptx empowers students and professionals with practical skills required in today’s rapidly evolving digital landscape.

  • Skriptx OpenAI Chat Plugin for WordPress

    Download Plugin

    Building intelligent, interactive websites just got easier.

    The Skriptx OpenAI Chat Plugin brings the power of advanced AI conversations directly into your WordPress site, allowing you to create smart chat experiences without complex coding or server setup.

    Developed by Skriptx, this plugin is designed for creators, businesses, and developers who want to add AI-driven engagement to their websites in minutes.

    ✨ What is Skriptx OpenAI Chat Plugin?

    The Skriptx OpenAI Chat Plugin connects your WordPress site with the intelligence of OpenAI models, enabling real-time chat interactions powered by GPT technology.

    Whether you’re running a blog, business site, LMS, or support portal, this plugin helps you turn static pages into interactive conversations.


    ⚡ Key Features

    🧠 AI-Powered Conversations

    Let users chat with your website using natural language. The plugin responds intelligently using OpenAI models.

    ⚙️ Easy Setup

    No complicated configuration. Just add your API key, configure settings, and start chatting.

    🎯 Custom Prompt Control

    Define system prompts to control tone, personality, and response behavior of your AI assistant.

    💬 Shortcode Integration

    Embed chat anywhere in your WordPress site using simple shortcodes.

    📱 Responsive Chat UI

    Fully mobile-friendly chat interface that works smoothly across devices.

    🔒 Secure API Handling

    Your OpenAI API key is stored securely and used only for requests you configure.


    🧩 Use Cases

    • Customer support chatbot for websites
    • AI assistant for educational content
    • Lead generation chat for business landing pages
    • FAQ automation
    • Interactive blog engagement
    • Internal knowledge assistant

    🛠️ Why Choose Skriptx OpenAI Chat Plugin?

    Most chatbot solutions are either too complex or too limited.

    The Skriptx plugin focuses on:

    • Simplicity for beginners
    • Flexibility for developers
    • Speed for production sites
    • Compatibility with modern WordPress themes

    If you’re already working with WordPress and want AI integration without rebuilding your stack, this plugin fits perfectly.


    📦 Built for Developers & Creators

    Whether you are:

    • A WordPress developer
    • A digital marketer
    • A SaaS builder
    • A content creator

    This plugin gives you the foundation to build AI-powered experiences quickly.


    🚀 Get Started Today

    Install the Skriptx OpenAI Chat Plugin, connect your API key, and transform your WordPress site into a smart conversational platform.

    The future of websites is interactive—and now you can build it.

  • The Ultimate Guide to Centering a Div

    Centering a <div> is one of the most common tasks in web development, yet it often confuses beginners due to the variety of available techniques. Depending on layout requirements, browser support, and project complexity, different approaches can be used to center elements both horizontally and vertically.

    In this guide, we’ll explore the most effective and widely used methods to center a <div> in CSS.


    1. Using CSS Flexbox (Modern Recommended Approach)

    Flexbox is the most popular and easiest method for centering elements in modern web development.

    Example:

    <div class="parent">
      <div class="child">Centered Div</div>
    </div>
    
    .parent {
      display: flex;
      justify-content: center;  /* Horizontal */
      align-items: center;      /* Vertical */
      height: 100vh;
    }
    
    .child {
      width: 200px;
      height: 100px;
      background-color: lightblue;
    }
    

    Why use Flexbox?

    • Simple and clean syntax
    • Works for both directions
    • Responsive-friendly

    2. Using CSS Grid

    CSS Grid is another modern layout system that makes centering extremely easy.

    Example:

    <div class="parent">
      <div class="child">Centered Div</div>
    </div>
    
    .parent {
      display: grid;
      place-items: center;
      height: 100vh;
    }
    

    Why use Grid?

    • Minimal code
    • Powerful layout system
    • Ideal for full-page centering

    3. Using Text Alignment (Horizontal Only)

    This method works only for horizontal centering.

    Example:

    <div class="parent">
      <div class="child">Centered Div</div>
    </div>
    
    .parent {
      text-align: center;
    }
    
    .child {
      display: inline-block;
    }
    

    Limitation:

    • Does not center vertically

    4. Using Position + Transform

    A classic and widely used technique for perfect centering.

    Example:

    <div class="parent">
      <div class="child">Centered Div</div>
    </div>
    
    .parent {
      position: relative;
      height: 100vh;
    }
    
    .child {
      position: absolute;
      top: 50%;
      left: 50%;
      transform: translate(-50%, -50%);
    }
    

    Why it works:

    • Moves element to center point
    • Adjusts offset using transform

    5. Using Table Display Method (Legacy Approach)

    This method is mostly used for older projects.

    Example:

    .parent {
      display: table;
      width: 100%;
      height: 100vh;
    }
    
    .child {
      display: table-cell;
      text-align: center;
      vertical-align: middle;
    }
    

    Note:

    • Useful for legacy browser support
    • Not recommended for modern apps

    6. Using Inline Styles (Quick Prototyping)

    Good for quick testing but not production use.

    Example:

    <div style="display:flex;justify-content:center;align-items:center;height:100vh;">
      <div style="width:200px;height:100px;">Centered Div</div>
    </div>
    

    7. Using Margin Auto (Horizontal Centering Only)

    Works when width is defined and only horizontal centering is needed.

    Example:

    .child {
      width: 200px;
      margin: 0 auto;
    }
    

    📊 Comparison of Methods

    MethodHorizontalVerticalModern Use
    Flexbox⭐⭐⭐⭐⭐
    Grid⭐⭐⭐⭐⭐
    Position/Transform⭐⭐⭐⭐
    Text Align⭐⭐
    Table Cell
    Margin Auto⭐⭐⭐

    🚀 Conclusion

    There are multiple ways to center a <div>, but the best modern solutions are:

    • Flexbox → Most flexible and widely used
    • CSS Grid → Clean and powerful for layouts

    Older methods like table display and inline styles still exist but are less preferred in modern development.

    Understanding all techniques helps you handle both modern projects and legacy code efficiently.


    💡 Tip: In real-world projects, Flexbox or Grid should be your default choice for centering elements.

    Happy coding! 🎯

  • Customize the Placeholder Color of an HTML Input Using CSS

    When designing modern user interfaces, small visual details play a major role in creating a clean and professional user experience. One such detail is the styling of placeholder text inside input fields. By default, browsers render placeholder text in a light gray tone, but CSS allows you to fully customize it to match your design system.


    🧩 What Is Placeholder Text?

    Placeholder text is the faint text displayed inside input fields before the user enters any value. It provides hints or examples to guide users.

    Example:

    • “Enter your name”
    • “Enter your email address”
    • “Search here…”

    It disappears once the user starts typing.


    🎯 Why Customize Placeholder Color?

    Customizing placeholder styles improves both design and usability.

    Benefits:

    • Enhances UI consistency with brand colors
    • Improves readability in different themes (light/dark mode)
    • Creates a more polished and modern interface
    • Improves user guidance and experience

    🎨 CSS Pseudo-Element for Placeholder Styling

    To style placeholder text, we use the ::placeholder pseudo-element.

    Basic Example:

    <!DOCTYPE html>
    <html lang="en">
    <head>
      <meta charset="UTF-8">
      <title>Placeholder Styling</title>
    
      <style>
        input::placeholder {
          color: #888888;
          font-style: italic;
        }
    
        input {
          border: 1px solid #ccc;
          padding: 8px;
          border-radius: 4px;
          width: 100%;
          max-width: 300px;
        }
      </style>
    </head>
    <body>
    
      <input type="text" placeholder="Enter your name">
      <input type="email" placeholder="Enter your email">
    
    </body>
    </html>
    

    🌐 Browser Compatibility

    Most modern browsers support ::placeholder, but older browsers require vendor prefixes.

    Cross-Browser Support:

    input::-webkit-input-placeholder {
      color: #888888;
    }
    
    input:-moz-placeholder {
      color: #888888;
    }
    
    input::-moz-placeholder {
      color: #888888;
    }
    
    input:-ms-input-placeholder {
      color: #888888;
    }
    

    💡 Best Practices

    🎯 Ensure Good Contrast

    Make sure placeholder text is readable against the input background.

    🎯 Don’t Replace Labels

    Placeholders should guide users, not replace proper form labels.

    🎯 Keep It Consistent

    Use consistent placeholder styling across all input fields in your application.

    🎯 Keep It Subtle

    Avoid overly bold or distracting placeholder designs.


    🚀 Real-World Use Cases

    • Login & signup forms
    • Search bars
    • Contact forms
    • E-commerce checkout forms
    • Dashboard filters

    📌 Conclusion

    Customizing placeholder text color using CSS is a simple yet powerful way to enhance your form design. With just a few lines of code, you can align your inputs with your brand identity and improve overall user experience.

    A well-designed placeholder may be small, but it contributes significantly to a polished and professional UI.


    Experiment with different colors and styles to create forms that feel intuitive, modern, and user-friendly.

  • Steps to Create Your Own NPM Module

    Creating your own NPM (Node Package Manager) module is one of the best ways to contribute to the JavaScript ecosystem, improve your development skills, and build reusable tools for real-world applications. NPM is the largest package registry in the world, and publishing your own module allows other developers to easily install and use your code in their projects.

    In this guide, we’ll walk through a practical step-by-step process to create, test, and link your own NPM module.


    🚀 Why Create an NPM Module?

    Before diving into the steps, here’s why it matters:

    • Reuse your code across multiple projects
    • Share your utilities with other developers
    • Improve modular programming skills
    • Gain open-source visibility
    • Learn package management deeply

    🧱 Step 1: Create Project Structure

    Create two separate folders:

    • Library folder → Your NPM module (core logic)
    • Demo folder → To test and use the module

    Example:

    /my-library
    /demo-app
    

    ⚙️ Step 2: Initialize NPM in Both Folders

    Run the following command in both folders:

    npm init -y
    

    This creates a package.json file for both projects.


    📦 Step 3: Setup Library Project

    Inside the library folder, install Parcel:

    npm install parcel
    

    Create the source file:

    src/index.ts
    

    Add your reusable code inside index.ts.

    Example:

    export function greet(name: string) {
        return `Hello, ${name}!`;
    }
    

    🔧 Step 4: Configure Library Build

    Update your package.json:

    • Set entry point
    • Configure build scripts using Parcel

    Example:

    "source": "src/index.ts",
    "main": "dist/index.js"
    

    🖥️ Step 5: Setup Demo Project

    Inside the demo folder, install Parcel:

    npm install parcel
    

    Create the following structure:

    src/
      index.html
      style.css
      app.js
    

    🔗 Step 6: Link Library to Demo

    Run this command inside the demo folder:

    npm link ../library
    

    This connects your local module to the demo project.


    📥 Step 7: Import Your Module

    In app.js, import your library:

    import { greet } from "your-library-name";
    
    console.log(greet("Skriptx"));
    

    ▶️ Step 8: Run the Projects

    Run both projects simultaneously:

    In library folder:

    npm run watch
    

    In demo folder:

    npm start
    

    🔄 Troubleshooting Tip

    If changes are not reflected:

    • Remove import line
    • Re-type the import
    • Restart the dev server

    📌 Final Workflow Summary

    1. Create library & demo folders
    2. Initialize NPM in both
    3. Build library using Parcel
    4. Create demo UI
    5. Link library using npm link
    6. Import module in demo
    7. Run both projects simultaneously

    🎯 Conclusion

    Creating your own NPM module is a powerful step toward becoming a professional JavaScript developer. It helps you understand modular architecture, build reusable components, and contribute to the developer ecosystem.

    Start small, build utilities, and gradually scale your modules into production-ready packages that others can use.


    🚀 Now go ahead and publish your first NPM module to the world!

  • How to Sort an Array of Integers in JavaScript

    Sorting is one of the most common operations in programming. In this article, we’ll learn how to sort an array of integers in ascending order using JavaScript.

    We will also explore a simple custom sorting logic using loops and array manipulation.


    🧠 Problem Statement

    Given a number (or array of numbers), we want to sort all digits in ascending order.

    For example:

    • Input: 123496758789456
    • Output: 123445567778899

    💡 Approach

    We will:

    1. Convert the number into a string
    2. Split it into individual digits
    3. Compare and rearrange digits using loops
    4. Return the sorted result

    This approach demonstrates basic sorting logic without using built-in sort().


    💻 JavaScript Program

    const nos = 123496758789456;
    
    console.log("Original:", nos);
    
    const sorted = sorter(nos).join('');
    console.log("Sorted:", sorted);
    
    function sorter(nos) {
        const splitted = nos.toString().split('');
    
        for (let i = 0; i < splitted.length; i++) {
            for (let j = i + 1; j < splitted.length; j++) {
    
                if (parseInt(splitted[j - 1]) > parseInt(splitted[j])) {
                    let temp = splitted[j - 1];
    
                    splitted.splice(j - 1, 1);
                    splitted.splice(j, 0, temp);
                }
            }
        }
    
        return splitted;
    }
    

    🔍 How It Works

    Step 1: Convert Number to String

    nos.toString().split('')
    

    This converts the number into an array of digits.


    Step 2: Compare Adjacent Elements

    We use nested loops to compare each digit with the next ones.


    Step 3: Swap Elements

    If the previous digit is greater than the next one, we swap them using splice().


    📊 Output Example

    Input:

    123496758789456
    

    Output:

    123445567778899
    

    ⚡ Better Approach (Recommended)

    Instead of manual sorting, JavaScript provides a built-in method:

    const nos = 123496758789456;
    
    const sorted = nos
        .toString()
        .split('')
        .sort((a, b) => a - b)
        .join('');
    
    console.log(sorted);
    

    🚀 Key Takeaways

    • Sorting can be done using loops or built-in methods
    • Manual sorting helps understand algorithm logic
    • .sort() is the most efficient and readable approach in JavaScript
    • Always prefer built-in functions in real-world applications

    🎯 Conclusion

    Sorting digits is a great exercise to understand array manipulation and comparison logic in JavaScript. While manual sorting builds algorithmic thinking, built-in methods like .sort() make code cleaner and more efficient.

    Keep practicing to strengthen your JavaScript fundamentals!

  • Convert a Number into Binary and Check if It’s a Palindrome

    Have you ever wondered whether the binary representation of a number reads the same forwards and backwards? If yes, you are exploring the concept of a binary palindrome. In this post, we’ll understand how to convert a number into binary and check whether that binary representation is a palindrome using a simple Python program.


    🔢 What is Binary?

    Binary is a number system that uses only 0s and 1s. It is the fundamental language of computers, where every piece of data is ultimately represented in binary form.

    Examples:

    • Decimal 5 → Binary 101
    • Decimal 9 → Binary 1001
    • Decimal 12 → Binary 1100

    🔁 What is a Palindrome?

    A palindrome is a sequence that reads the same forward and backward.

    Examples:

    • "121" → Palindrome ✅
    • "101" → Palindrome ✅
    • "110" → Not a palindrome ❌
    • "1001" → Palindrome ✅

    So, a binary palindrome means the binary form of a number looks the same in both directions.


    💡 Problem Statement

    We need to:

    1. Take a number as input
    2. Convert it into binary
    3. Check whether the binary string is a palindrome

    🧠 Approach

    To solve this problem, we follow these steps:

    Step 1: Convert Number to Binary

    In Python, we can use the built-in bin() function:

    bin(number)
    

    This returns a string like "0b101" — so we remove the "0b" prefix.


    Step 2: Check Palindrome

    A string is a palindrome if:

    string == string[::-1]
    

    💻 Python Program

    def is_binary_palindrome(n):
        # Convert number to binary and remove '0b' prefix
        binary = bin(n)[2:]
        
        # Check if binary string is palindrome
        return binary == binary[::-1]
    
    # Example usage
    num = int(input("Enter a number: "))
    
    binary_form = bin(num)[2:]
    print("Binary Representation:", binary_form)
    
    if is_binary_palindrome(num):
        print("The binary number is a palindrome ✔")
    else:
        print("The binary number is NOT a palindrome ❌")
    

    🧪 Sample Output

    Input:

    Enter a number: 9
    

    Output:

    Binary Representation: 1001
    The binary number is a palindrome ✔
    

    🚀 Key Takeaways

    • Binary is the base-2 number system used in computing
    • A palindrome reads the same forwards and backwards
    • We can easily check binary palindromes using Python string slicing
    • This is a great beginner problem for learning both number systems and string manipulation

    🎯 Conclusion

    Understanding binary palindromes helps strengthen your knowledge of number systems and programming logic. With just a few lines of Python code, you can convert numbers and analyze their binary patterns efficiently.

    Keep practicing and explore more such logical problems to improve your coding skills!